3 people found this helpful

If you already have the classic paper plane model down, why not kick your craft skills up a notch by learning how to make an airplane. This may sound challenging, but don’t worry! Cardboard planes are actually super easy to make. Crafting this homemade toy is also an opportunity to recycle your Plenty kitchen towel rolls!
Whether it’s during the holidays, on a rainy day, or just to pass the time, making a homemade toy in the shape of a cardboard aeroplane is a sure way to keep kids occupied and having fun. From what you’ll need to how to make your cardboard plane and then decorate it, we’ll show just how easy it is to make a cardboard plane.
How to make a cardboard plane:
First thing’s first: what materials do you need to get your DIY plane project off the ground? We’ve got you covered. Get ready for take-off! Because we’re going to show you just how easy and entertaining it is to make your own eco-friendly cardboard airplane. Take a look!
The good news is that you really don’t need much for this airplane craft. Cardboard tubes, a cereal box, and a pair of scissors will get your plane flying in no time. And better yet, these are all things that you probably have lying around the house already.
Have a root through your recycling and see what you can find to make your DIY plane. Here are some things you’ll need to keep in mind when looking for your airworthy materials:
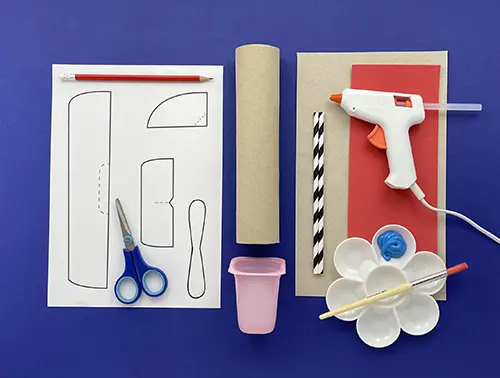
- Cardboard tube from Plenty kitchen towel
- 2 paper straws
- Paint and brushes
- Scissors
- Thin cardboard (e.g. a cereal box)
- Glue gun
- Small yoghurt pot
- Foam sheet
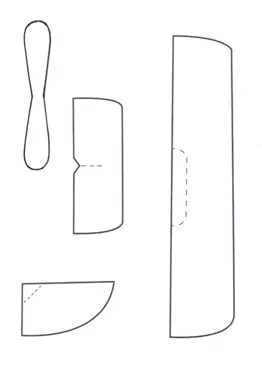
- Pattern to print
Tip
Try using a cardboard tube from a recycled roll of Plenty The Extra Big One to make your cardboard airplane.
How to make an airplane: step-by-step
Now that you have your materials at the ready, it’s time to put things into motion and begin making your homemade toy! Gather around the table and follow these simple steps to build your airplane craft:
-

-

-

-

-

-

-

How to choose the colours of your cardboard plane
Now that you know how to make a plane, you can get even more creative with your designs. For example, if you want to give your plane a more classic look, try using only two colours. You can take inspiration from the complementary colours of red and green, blue and orange, or yellow and purple to create nice visual harmony. To personalise the plane even more, your aspiring pilot can draw their own designs on the wings and body of the plane before assembling the pieces. The creative possibilities really are endless!
How to make a cardboard airplane a fun party activity
Do you have an airplane lover in your life that would simply adore an airplane themed birthday party? Then what better activity to include than making a DIY plane! Invite your flight-fanatic guests to take part in this fun craft activity for an exciting homemade toy that they can take home later. You can even make it an environmentally friendly party by asking the kids to bring their own recycled materials for the festivities!
Just remember to keep an adult present and on hot-glue-gun duty and you’ll be good to go. And if you’re feeling really crafty, you could even make little animal friends out of cardboard tubes too!
Related articles
2 easy ways to make homemade musical instruments for kids
Looking for easy ways to have fun with your kids while teaching them how to recycle? Learn how to make musical instruments from waste material.
Why is my cat being sick? Symptoms, causes, and solutions
“Why is my cat sick?” Learn about the signs of illness in cats, the reasons why your feline friend might be sick, and how to treat a sick cat at home.

How to save money at home: simple saving tips and budgeting tips
Looking for simple ways to save money at home? Follow our budgeting tips and saving ideas to help you save money and provide more for your loved ones!

How to speed up composting: 10 hacks to accelerate your compost
Are you looking for ways to speed up your compost? Discover how to accelerate compost with our 10 hacks. Accelerating your compost has never been easier!
What to do with leftover food: creative ways to use food leftovers
From leftover chicken ideas, to what to do with leftover rice, find out how to get the most from your food leftovers.

Shortage of water: what is water stress and what can we do about it?
What is water stress, and what can we do to reduce its impact? Learn about water stress, its definition, causes, effects, and how to help water scarcity.
