1 person found this helpful
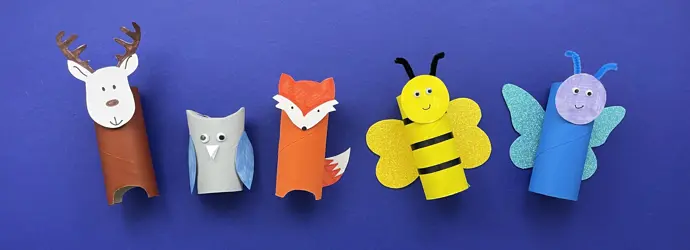
If you have paint, coloured pens, cardboard tubes, and clever little fingers – creating these cute little creatures is easy! These easy crafts for kids are a super fun and simple enough for children to get stuck into. Simply start with a few empty rolls of Plenty kitchen towel and a little imagination to create these fabulously fun arts and crafts to do at home:
- Cardboard bee craft
- Cardboard butterfly craft
- Cardboard reindeer craft
- Cardboard fox craft
- Cardboard owl craft
With these five animal crafts for kids, the little ones will be surrounded by a group of new friends as cute as they are simple to make!
Tip
As well as needing used rolls of Plenty The Original One to make your cardboard animals, a roll of Plenty Flexisheet is useful for any crafting that involves paint or glue, to mop up those inevitable spills! With Flexisheet, you choose what you use, so whether the spill is big or small, you’ll always have the right amount of kitchen roll to hand.
How to create your own DIY bee and DIY butterfly from cardboard
Let your little artists have the chance to allow their imaginations to run wild with our cute and simple DIY cardboard butterfly and bee. Read on and follow the steps to help your children create their very own winged friends.
Tip
Whilst it is great to get the children involved in bringing these easy crafts for kids to life, make sure the adults take care of the cutting.
Before you get started creating your cardboard butterfly and bee, there are a few things you’ll need to get together for these animal crafts:
- Cardboard tube from Plenty kitchen towel
- Scissors
- Paints and brushes
- Glitter felt
- 40cm of black ribbon
- 4 googly eyes (optional)
- 10cm pipe cleaner
- Black pen
- A4 sheet of card
- Stapler
- Glue
- Pattern to download here
- Coloured pens


How to make a cardboard butterfly and bee: step-by-step
Now you’ve got all the bits you need together, follow these 5 simple steps (with handy photos!) to create your own cardboard butterfly and bee animal crafts:
-

-

-

-

-


Just like that you have 5 simple steps to create a cardboard butterfly and bee. If a woodland or forest animal is more your thing, though, check out our three woodland animal crafts below.
Crafting animals of the forest
A cardboard butterfly and bee aren’t the only animal crafts you can put your hand to. If you’re keen to make more animal crafts, try these DIY cardboard animals straight out of the forest.
Just as when you got creative making the cardboard butterfly and bee, there are a few things you need to get together for these woodland animal crafts:
- 2 cardboard tubes from Plenty kitchen towels
- Scissors
- Paints and brushes
- Colouring pens
- Coloured paper
- A4 sheet of card
- Glue
- Googly eyes
- Pattern to download here.


How to make cardboard animals from the enchanted forest
Once you’ve gathered all the materials you need, it’s time to get your DIY on. Here are 7 easy-to-follow steps to create an owl, a fox, and a reindeer, to add to your collection of animal crafts for kids:
-

-

-

-

-

-

-


Seven simple steps and away you go! Now you know the fundamentals of these animal crafts, the possibilities are endless! Why not get creative and adapt these steps to make sea creatures, monsters and so much more? You could even make a cardboard plane next.

These easy crafts for kids are perfect for decorating your little one’s bedroom. With this recycling craft activity, you can give a second life to your rolls of Plenty kitchen towels.
Did you find this article helpful?Thanks for your feedback!
or
Do you have a question on this topic? Contact us
Related articles
2 easy ways to make homemade musical instruments for kids
Looking for easy ways to have fun with your kids while teaching them how to recycle? Learn how to make musical instruments from waste material.

Why is my cat being sick? Symptoms, causes, and solutions
“Why is my cat sick?” Learn about the signs of illness in cats, the reasons why your feline friend might be sick, and how to treat a sick cat at home.

How to save money at home: simple saving tips and budgeting tips
Looking for simple ways to save money at home? Follow our budgeting tips and saving ideas to help you save money and provide more for your loved ones!

How to speed up composting: 10 hacks to accelerate your compost
Are you looking for ways to speed up your compost? Discover how to accelerate compost with our 10 hacks. Accelerating your compost has never been easier!

What to do with leftover food: creative ways to use food leftovers
From leftover chicken ideas, to what to do with leftover rice, find out how to get the most from your food leftovers.

Shortage of water: what is water stress and what can we do about it?
What is water stress, and what can we do to reduce its impact? Learn about water stress, its definition, causes, effects, and how to help water scarcity.
