15 people found this helpful
Don’t let the mess caused by glue, water and paint deter you from paper mache making – this activity is just too fun to miss out on.
It looks like it should be complicated, but if you’re asking yourself, ‘what can I use for paper mache?’ the answer is: a few simple items! All that’s needed to make homemade paper mache are a couple of objects you’re likely to have lying around the house already, including some glue, water and strips of kitchen paper. We recommend using Plenty MAX as it is 3x stronger when wet, which will come in handy once covered in glue. Finally, add in a kitchen paper tube and an empty tissue box and you’ve got the basis for your very own paper mache animals.
Let your kid’s imagination run wild and make whatever creatures they like with kitchen roll paper mache. From unicorns and ponies to dragons and dinosaurs, there are so many options. Looking for a little inspiration? We’ll show you how to make paper mache animals step by step, using a crafty crocodile as our example.
Tip
We recommend that a responsible adult does the cutting when making paper mache crocodiles. This way the kids can take care of the art direction, painting and gluing (the most fun parts)!
What glue do you need for paper mache
A few different types will work, but we suggest using either wood glue, also known as pva glue, or white Glue-All. Flour is also an alternative to glue, however the latter tends to dry much quicker. On the other end, flour is cheaper, so it comes in handy if you’re on a budget or are out of glue and don’t want to make the trip to the supermarket. Whichever you go for the instructions on how to make paper mache will remain similar so keep reading to find out more.
What you'll need for paper mache making
· Plenty kitchen paper tube
· Scrap cardboard
· Pencil
· Ruler
· Scissors
· Sticky tape
· PVA glue
· Water
· Bowl
· Green paint
· Paint brush
· White pen
· Black pen
How to make a paper mache crocodile
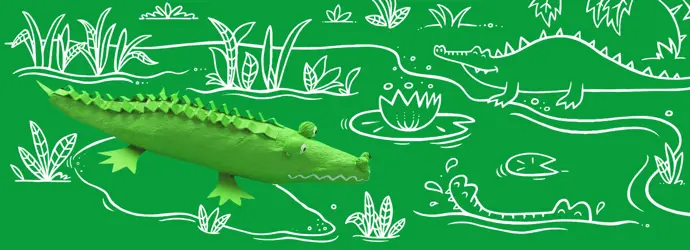
Make our wild-yet-friendly paper mache crocodile using strong Plenty kitchen paper – simply use an empty tube as a base and build up layers of ‘skin’ with paper and glue. Give him some spikes and feet with a few strips of Plenty paper glued together, then paint green and add some wiggle eyes. If you’re wondering how long it takes for paper mache to dry, then bear in mind that it will take roughly 24 hours. So why not check out some easy kids’ recipes to keep them entertained while you wait for the paper mache to dry?! They’re yummy and safe to make.
Here’s how to make a paper mache crocodile in a few simple steps:
-

-

-

-

-

-

-

-

- Name them! Every new pet in the house needs a name and your paper mache croc is no different. How about Doc the Croc? Or Niall? Whatever you choose, make it something snappy.
When learning how to make paper mache animals step-by-step, there’s always going to be a bit of mess. But as long as you haven’t suddenly got a new, paper mache floor, you’ve done a great job! If you do, however, find some glue stuck to your floor – fear not – you can learn how to remove it from wood and hard surfaces here. We hope to have given you some inspiration on easy paper mache ideas - for more arts and crafts activities, learn how to make paper toys without making too much of a mess.
Did you find this article helpful?Thanks for your feedback!
or
Do you have a question on this topic? Contact us
Related articles
2 DIY garden party decorations
You’ll love our step-by-step DIY garden decoration tutorials. Discover how to make two DIY garden ornaments here!

Fun indoor camping ideas
Fancy camping in the living room? Our guide provides you with a number of DIY indoor camping ideas for kids.

How to make salt dough for kids
Have hours of fun with your pre-schooler by making salt dough and getting creative with these salt dough ideas. Read on for a simple recipe.

Impressive school lunch box ideas for kids
School lunch box ideas can sometimes start to become repetitive. Freshen up lunchtimes with this handy guide to impressive healthy lunch box ideas for kids.

7 steps to create a DIY cardboard castle at home
Learn how to make a cardboard castle to fit their favourite interests. Find step-by-step cardboard castle DIY instructions and theme ideas here.

5 messy games and activities for energetic 3-year-olds
These games for 3-year-olds might make lots of fun mess, but they’re easy to clean up! Click for great activities featuring ice, jelly, paint and pompoms!
